Domestic motorcycle brands offer motorcycle models with both two-stroke and four-stroke engines with cylinders ranging from one or more in various displacement capacities for Indian consumers.
Even the simplest single-cylinder motorcycle engine is made up of many parts and depending on the design and configuration, the number of parts can vary from engine to engine.
For instance, an air-cooled engine will have fewer components than an oil-cooled variant. Likewise, an oil-cooled engine with an external oil cooling management system will have fewer components than a liquid-cooled engine with a radiator. (Here is a detailed post on different cooling systems)
Then you have older generation engines with kickstarter levers only, while newer machines have electric self starters and some are offered with both.
Modern motorcycle engines are described as unitary construction that means in a common crankcase housing you have the engine and transmission components.
In vintage and classic motorcycles, the engine and transmission were separate units.
Dismantling an engine for an overhaul doesn’t take a lot of time when you have the proper tools to do it.
Tools needed
Standard tools: A socket set with ratchets/handles, wrenches, flat and cross head screwdrivers, a rubber head hammer or plastic mallet, normal hammer, hydraulic jack, pliers (normal/nose/water pump/circlip), plug wrench, some thick wood strips and adjustable type slide-wrench.
Special tools: Impact screwdriver set, a small flat headed chisel, bearing puller, scraper for removing stuck packing/gaskets and lock pliers. Butane gas torch is handy if you can get one. although it can be considered as optional.
Consumables and extras: Anti-rust spray like WD40, clean cloth, cleaning solvents like kerosene oil, 1” brush, pan for waste oil collection and plastic containers for storing of loose parts.
Good housekeeping pays
There are several starting points for beginning the disassembly and there are some housekeeping rules that should be followed in view of the numerous parts of various shapes, sizes, and configurations involved.
Always prefer to work in a well-lit place that has good ventilation. It’s very easy to misplace small parts during disassembling if one is careless about work!
Aim to do the job nice and clean and one should think of the environment where the work is to be done as well.
When disassembling parts, make it a habit to group and tag them if they are to be reused or sent for other jobs like zinc plating or machine shop work.
Safety first
Safety is a key consideration before you do any work on the motorcycle. First stabilise the motorcycle by propping it on the center stand. Never use a side stand when doing such jobs. Ensure the ground is flat and not uneven.
Save the environment
It is a good idea to drain the engine oil as you would do during a normal oil service before commencing the disassembly. This will save oil spill mess and clean up.
Have a pan placed underneath before undoing the sump bolt to release the oil. Once done, remove the oil pan and store the used engine oil in a leak proof container for disposal later on. In some machines, the independent oil filter can also be removed. Also remember to disconnect the oil cooler radiator and associated hardware.
In water-cooled engines, disconnect the radiator and drain the coolant. Detach connecting hoses and other plumbing as necessary.
What to remove first…
To access the engine, the work area must be clutter-free. For fully faired motorcycles, the ABS plastic fairing must be removed completely. A lot of small clip-on parts will be there, so have a container handy to help secure screws and clips in one place.
Secondly, remove any extra stuff like fog lamps or horns and safety bar (leg guard).
Disconnect electrics
You must disconnect all electrical equipment like battery, connectors, spark plug wires, starter motor among other components like the fuel tank. Ensure wiring harness connectors don’t foul the work area. Need not remove the harness, just arrange to keep it away from the work area around the engine.
Lighten the load
Even with the engine bolted on the chassis/frame, you can take some parts out.
For convenience of work later, it makes sense to remove crankcase covers on either side.
To do this, you will need to remove some parts that may interfere with the tools reaching the side cover bolts like footrests, brake pedal and kickstarter lever (if your motorcycle has one).
Tackling with tough bolts
While some bolts will come out comfortably, some seem to be obstinate and a lot of patience is required. Do not attempt to force open them as they may break.
Spray WD40 liberally and let the rusted or stuck bolt soak the rust removing chemical for a few minutes.
Try again, if it works. If the bolt comes out, you are fine, if not then there’s plan ‘B’.
So what’s plan ‘B’? It’s a time-tested method but has to be done with precision. You can use the impact wrench or impact screwdriver that needs a tap from the hammer. Usually, it will release the tough bolt/screw and then you can use your normal socket or spanner or screwdriver to undo it.
If this doesn’t work, mechanics have a DIY way of doing it. What they will do is take a flat headed rod and tap the stuck bolt on the head a few times followed by a gentle twist. This works in most cases. In very rare instances you may need to heat the bolt head with a blow torch. If using this method, don’t overdo it as it may do more harm than good! A specialist help would be required in such a scenario.
Start from the top
This is where the serious business begins. Begin by removing components that might obstruct the free movement of parts that are to be removed. Usually, it’s the high tension (HT) coil, starter relay (for self starter models). Also remove the carburetor, carburetor manifold, and air filter and keep aside. Disconnect exhaust from the manifold onwards.
Start unbolting the cylinder head nuts. What to do next will depend on the type of motorcycle engine you are working on.
Different strokes for different folks!
In motorcycles with overhead cams that are connected to timing chain sprockets, you will need to remove the cam chain sprocket from inside the head. This sprocket is fixed to the camshaft with two small bolts and is easy to remove. The cam chain is pulled down through the cylinder.
In older pushrod type engines, the cam follower or rocker assembly has to be removed first followed by the pushrods.
In two stroke engines, there are no parts like cams or valves or timing chain assemblies or push rods.
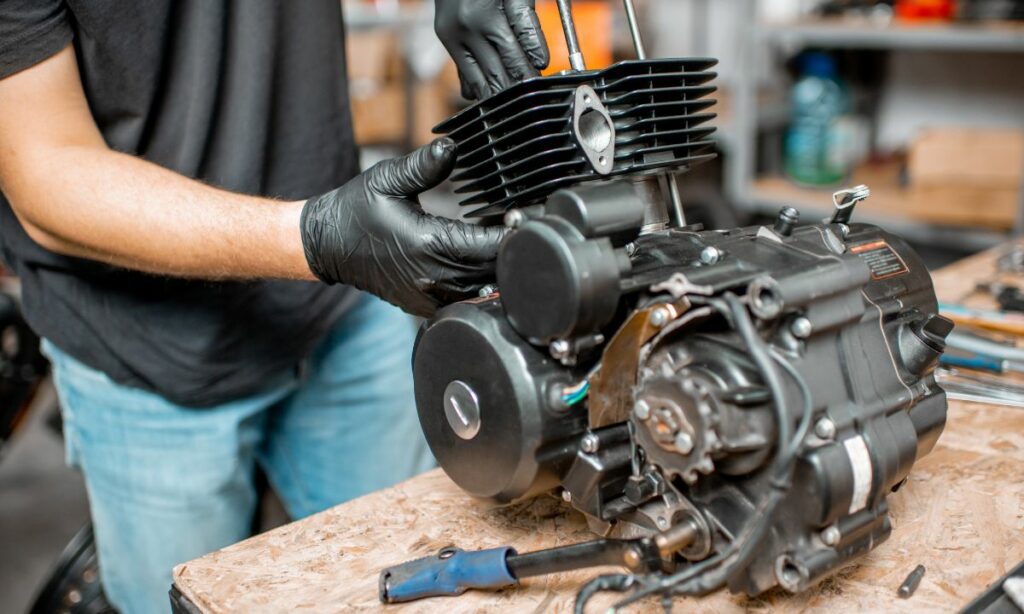
After the nuts from the head have been removed, a light tap upwards will release the head from the gasket with a flat headed screw driver is usually sufficient. Be careful not to poke too much as it might damage the contact surface of the aluminium cylinder head in newer motorcycles (cast iron in very older machines).
Take it out carefully and you will see the cylinder and exposed portion of the long bolts.
Taking out the cylinder
Next comes one of the heaviest parts of an engine — that is the cast iron cylinder or aluminium cylinder with cast iron liner. To remove it, one needs to hold it from both sides and nudge it. It should come off without much fuss once the gasket is released.
Remember to be steady as there will be some resistance from the cylinder with a piston inside it. For single-cylinder engines, it’s a one-man job.
For heavier or bigger displacement motorcycles, a pair of extra hands will be helpful.
I would recommend wearing heavy industrial gloves to avoid injuries to hand in case the cylinder falls back. It won’t fall out as long as the long studs are there to guide it.
The long bolts can be removed now. The simple way to do it is to double nut the threaded top part of the stud and unbolt it or use a lock plier on the unthreaded portion and twist it anti-clockwise. The grip must be solid otherwise the tool will slip and scratch the stud. The first method described is generally preferred as a safer one.
Removing the piston
After the cylinder has been successfully removed, get circlip pliers and manouevre the locked circlip out of the piston on one side.
From the other side, slowly push the gudgeon pin out of the piston. Now, the piston can be removed safely. Repeat process for other pistons.
Unbolting the engine from the frame
If the rest of the engine is still bolted onto the chassis, then this is a good time to remove it as it is much lighter and safer to do.
Identify the engine mounts, corresponding bolts and brackets. Start removing them one by one and be alert too as the engine will begin to wobble.
In motorcycles that have a frame design where the engine itself forms a stress member, then certain extra precautions are to be taken.
Have the jack ready and place it under the engine. Choose a middle portion and avoid placing it near vulnerable bracket points.
Sandwich pieces of strong wood to avoid damage to the crankcase. Have someone watch and hold the engine while it is being unbolted and unloaded from the chassis.
After the bolts and brackets have been removed, the engine should be free to move. Balance it carefully on the jack and slowly take it out. Place it on a wood base and secure it.
Be aware of the solid mass and act accordingly.
Separating the crank cases
In motorcycle engines, the aluminium crankcases are cast in two parts and are bolted to form the housing for the crankshaft, gearbox assemblies and other mechanical hardware.
Some machines may have an intermediate piece. Once the covers are opened, bolted on the crankshaft on the left hand side (in most modern bikes) is the generator/alternator and on the opposite side the clutch assembly. Both of these will have to be removed first.
Removing the alternator
To remove the generator special tools are required. When the generator was fitted on the crankshaft, it was locked into position using a Woodruff key.
After releasing the lock nut, a puller tool is used to remove the top portion of generator assembly from the crankshaft. Once this is out, the stator can be easily unscrewed with a screwdriver.
Since nearly all modern motorcycles have some form of electronic ignition, manufacturers pre-set the timing at the time of assembly and usually lock the pick-up coil sensor.
The locking screws are painted and need not tamper with factory settings unless you have the appropriate equipment to reset it. Be careful not to damage the pick-up coil.
Removing the clutch assembly
Removing the clutch assembly is easier than removing the generator. However, the number of components in a clutch assembly are more and will require normal socket wrenches for removal and dismantling.
There will be a lot of small parts in the clutch assembly like clutch basket, friction discs and clutch plates besides a cable adjuster, a pushrod (some engines have two), steel ball, springs, lock washers, bolts, spacers and guides among others. When unbolting try to keep the spring tension under control.
Before splitting the case remove the cam chain tensioner. Use the same impact screwdriver to loosen the screws.
When done, give a light tap with a block of wood or plastic mallet. The halves will get detached. Do not wedge any metal like a screwdriver in the gaps as they can damage the soft faced machined surface.
What’s left inside now?
The right half of the crankcase houses the transmission hardware, cam balancer, crankshaft, gear shift drum, connecting rod.
Start pulling out the shift fork shafts that will enable it to remove the transmission shafts. You may have to juggle the parts or turn them to release them by hand.
No tools are required to remove the engine balancer.
You can now pull up the right side of the crankcase half. Once this is done both transmission and crankshaft are out of the crankcases. Take care of small items like dowels, shim washers, lock washers, oil seals and bearings. Secure the parts that are to be used later.
Conclusion
For experienced people, the job will take around 1-2hrs at the most.
For first timers, a bit more as they will encounter forced pit stops (stuck bolts or screws) to contend with. It’s not rocket science, so with patience and logical thinking, even DIY enthusiasts can perform the job comfortably.