You have a perfect running motorcycle and without warning it begins to stutter and misfire. Then you find it hard to start the engine and it seems to have a rough idle and loses power when it does.
Obviously, there’s something wrong and it needs attention. There could be several reasons for this — fuel supply issues, electrical problems, engine condition or common problems with the unsung heroes of your vehicle — spark plugs to be precise.
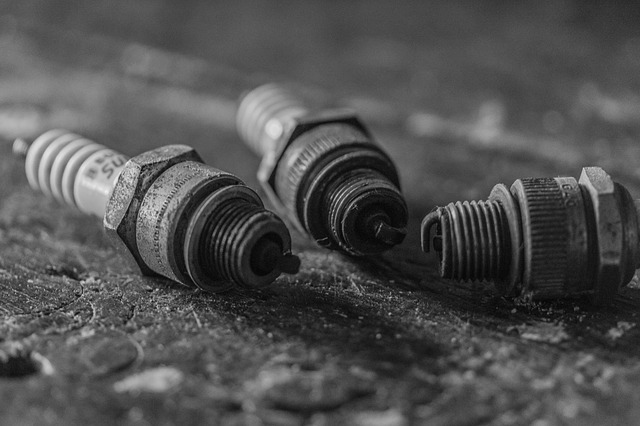
All internal combustion engine powered petrol/gas motorcycles use spark plugs for ignition. Spark plugs are common to both 2-stroke and four-stroke engines and play a pivotal role in the machine’s overall performance.
What Does A Spark Plug Do In A Motorcycle?
Spark plugs are among those consumable parts in the ignition/combustion system in your motorbike engine.
They are designed to produce a high voltage spark (15,000-20,000 volts), which helps ignite the atomised fuel-air mixture in the engine cylinders. As a result of combustion, the engine converts fuel energy into kinetic energy.
Very similar to many wear and tear components in an internal combustion engine (ICE) powered motorcycle or scooter, spark plugs also have a working life span. They need to be cleaned periodically or replaced if worn out or if they malfunction.
What Causes Spark Plugs To Fail?
There are many factors that can cause a spark plug to fail or perform poorly. Among them are incorrect heat ranges, improper gapping, chemical contamination or electrical issues among others.
Without that crucial spark for ignition by the spark plugs in the combustion chamber of the engine, the engine is rendered virtually dead till the spark plug problem is fixed.
Since several components are involved, the job of fixing the starting problem could be as simple as a faulty spark plug or more complicated if other service parts are involved.
What is the average lifespan of spark plugs?
A motorcycle spark plug usually have a lifespan of 10,000 miles (16,000 kilometres). Exceptions exist with few spark plugs built to last much longer.
Here is a detailed post on spark plugs’ lifespan.
In addition, if the color of insulator is distinctly different from tan, or the electrodes have eroded, or there are excess carbon deposits, then the spark plug needs to be replaced in these cases as well.
How To Check, Clean And Replace A Spark Plug?
Checking, cleaning or replacing a spark plug can be a simple DIY operation for some and not so easy for those who opt for professional help.
Where to begin?
As a rule of thumb, always start with the elimination process and gradually work your way up the latter when troubleshooting.
The market offers various types of motorcycles — street biased, off-road, sports bikes, adventure, cruiser, motocross among many other styles in-between.
For most modern four-stroke motorcycles that have overhead valve architecture, access to spark plugs is relatively easy where the engine is exposed.
The design of the motorcycle will determine the ease of the operation or otherwise.
In the case of an engine misfire or starting issue, the best place is to start by checking the spark plugs.
Of course, a few specific tools will be required.
Most new motorcycles are supplied with a toolkit that has a spark plug tool, so this should be easy.
Tools Required
In general, tools that required are:
- Spark plug wrench
- A flat head screwdriver
- Feeler gauge or spark plug gap opener
- Small wire brush
- Sand paper
- Spark plug boot removing pliers (optional)
- In-line spark testers are also used by professional after-service providers.
Changing A Spark Plug
Even if you are not a technical genius, changing a spark plug in a motorcycle isn’t rocket science. It just needs a bit of patience and common sense!
The easiest to work are the naked motorcycles or machines with minimalistic body kit.
Full-faired machines will require some dismantling work before access to spark plugs can be made. Obviously, this will require a lot of time and patience besides specific tools.
And clearly, it is not the case for the faint-hearted!
Once the access to the spark plugs have been made, the spark plugs that are screwed on the cylinder head have to be removed carefully. This can be easily done with the proper spark plug tool.
Before doing that, one must switch off the ignition, prop up the motorcycle and ensure it is in neutral gear.
Besides, the high tension wiring lead that connects the high tension coil to the spark plug via the plug cap has to be removed before the plug opening tool is applied.
What To Check For After Removing The Spark Plug?
If your motorcycle engine is tuned properly, the spark plug should have a light brown residue on the electrode.
If it appears oily or has black deposits, it may be the reason for not performing as it should. It may also indicate unnatural wear-and-tear of the engine’s piston and rings.
Another reason for weak sparks is excessive gap of the electrode.
After testing and validating the condition of the spark plug and deciding what route to take — that is replacing the old one with a new one or retaining the old one after a clean up, there’s one important consideration that should not be overlooked.
Spark plugs come in different sizes and specifications and are not interchangeable.
What to do with the spark plug eventually will depend on its physical condition and performance.
The spark plug’s condition to some extent can be ascertained by physical observation once it has been removed from the engine.
Here is another way to to check spark plug condition.
An Advanced Testing To Check Spark Plug Performance
Power to ignition must be on and then turn the engine over with the spark plug hanging but touching the body. Observe what happens at the gap of the plug’s tip.
Remember, depending on engine design, about 15,000-20,000 volts are running through the spark plug and hence do not touch the metal part of the plug when running the electrical test.
While touching it won’t kill you, but the experience is definitely unpleasant and must be avoided at all costs.
If the plug is OK, you should see a sharp blue spark arcing between the tip of the inner central electrode of the plug and the bent metal top.
If there’s no spark on the plug, the plug is at fault. If there’s no spark on the wire, then the problem could be elsewhere in the electrical system.
For more info, here is an in-depth post on testing spark plugs.
Fitting The Spark Plug Back
When putting back the plug – a new one if the old spark plug is at fault or the old one cleaned if it’s working smoothly, there’s an element of caution that is not to be ignored. This is because an under-torqued spark plug will not make full contact with the cylinder head and cause problems.
A loose plug will not transfer heat as engineered and will cause pre-ignition and detonation and lead to engine degradation. In a worst case the combustion could make the plug shoot out of the socket and damage other components besides the plug itself.
Do remember to clean the area around the spark plug hole before refuting it and make sure the plug thread is free of contaminants. Since we have dusty conditions, the dust can accumulate as debris around the threads and damage them during removal and refitting.
Do’s And Don’ts
- Never attempt to work on the engine when it is running or hot.
- Always allow the engine cool down before removing the spark plug.
- Gently pull off cap fitting that sits over the top of the spark plug.
- Never use force to remove the ignition wire because this can cause damage to the spark plug cap.
- If the cap and ignition wire don’t want to come off easily, try nudging the rubber fitting as you pull the cap or use the spark plug boot removing pliers if you have one.
- Spark plug caps act as insulators and are made of bakelite. Bakelite spark plug caps can break or crack if mishandled. If cracked, they have to be replaced with new ones.
- Use proper tool like spark plug wrench to remove spark plug.
- Be careful and do not drop the spark plug. Doing so, it may damage the ceramic insulator (white part).
- Use approved and safe solvents to clean the spark plug.
- Use feeler gauge to set the electrode gap as per manufacturers’ specifications.
- Be careful when putting the plug back into the threaded hole in the cylinder head.
- Always follow the manufacturer’s torque specifications when installing a spark plug.
- Always replace a bad or worn out spark plug with a new one of the same specification.
- Ensure motorcycle is in neutral gear and preferably propped up on its center stand before the electrical test.
- Buy branded OEM products from reliable sellers.
- Fake or reconditioned spark plugs will jeopardize the performance of the engine and compromise the safety of the rider as they can fail anytime.